Last updated: April 2026
If you’re an indie hacker, freelancer, or small business owner based in Europe selling SaaS or digital products globally through Stripe, there’s a good chance your tax setup isn’t fully compliant. Not because you’re careless, but because the information you need is scattered across Stripe’s documentation, your country’s tax regulations, and dozens of generic articles that never quite address your specific situation.
This guide is based on my own experience configuring Stripe for multiple SaaS products sold from Spain to customers worldwide. While some specifics are Spain-centric, the overall setup — multi-currency pricing, Adaptive Pricing, Stripe Tax, invoice customization, and payout configuration — applies to any EU-based seller using Stripe.
Who Is This Guide For?
Freelancers, solo founders, and small businesses based in the EU that sell digital services (SaaS, token packages, subscriptions, online courses, ebooks, etc.) through Stripe, with both domestic and international customers. If you use Stripe Checkout, Payment Links, or Stripe Billing to collect payments, this guide is for you.
Part 1: Multi-Currency Pricing Setup
The Problem With Single-Currency Pricing
When selling SaaS internationally, pricing in USD is the convention: $29, $49, $59. These are psychologically clean price points that work globally. But if you’re based in the EU, your accounting currency is likely EUR, and charging exclusively in USD creates friction:
- Every sale requires a currency conversion for your bookkeeping.
- The exchange rate difference between invoice date and payout date creates foreign exchange gains or losses that must be recorded.
- Stripe applies a spread (implicit fee) when converting to EUR if your payouts are in euros but charges were in dollars.
- Your European customers see prices in a foreign currency, which can reduce conversion rates.
The Solution: Multi-Currency Prices in Stripe
Stripe allows you to define prices in multiple currencies for the same product. You can have a plan that costs $29 USD and €27 EUR simultaneously. Each price is fixed and independent — there’s no dynamic conversion involved.
Step-by-Step Configuration
- Go to Stripe Dashboard → Products and select the product you want to edit.
- In the pricing section, click the three-dot menu (⋯) on an existing price, or create a new one with the + Add another price button.
- When creating or editing a price, you’ll see an “Add another currency” option. Click it.
- Select EUR as the additional currency and set your desired euro price. Stripe will suggest an equivalent based on the current exchange rate, but you can enter whatever amount you want.
- Save your changes.
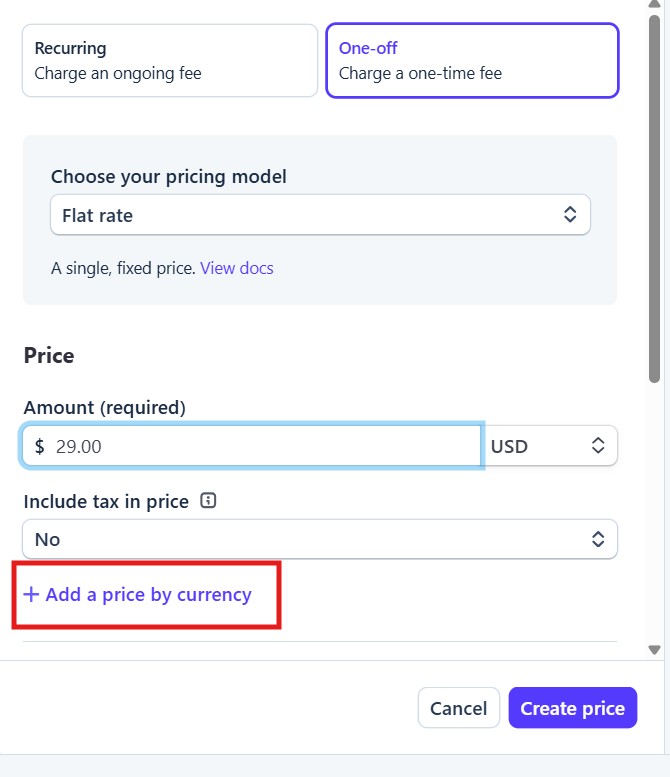
Important: If a price has already been used in a transaction, Stripe won’t let you add additional currencies to it. In that case, you’ll need to create a new price with both currencies and update the price_id in your code.
What Euro Prices to Set?
It depends on your pricing model:
- Round psychological prices (subscriptions like $29, $49, $59): Set a clean euro equivalent. For example, €27, €45, €55. The goal is for European customers to see a tidy price.
- Cost-based prices (token packages, usage-based): Convert at the current exchange rate and round reasonably. Or better yet, recalculate the cost directly in euros and apply the same margin.
Updating Your Code
If you’re using Stripe Checkout (common in Replit projects or any web app), your code references a price_id. When you create new multi-currency prices, you’ll get new price_id values that need to be updated in your codebase.
# Before (single-currency USD price)
price_id = "price_1ABC123..."

# After (new price with USD + EUR)
price_id = "price_1XYZ789..."
Stripe will automatically select the correct currency based on the customer’s location when using Checkout.
Part 2: Enabling Adaptive Pricing
What Is Adaptive Pricing?
Adaptive Pricing is a Stripe feature that automatically converts prices to the customer’s local currency in 150+ countries. You keep your base prices in USD (or EUR), and Stripe shows each buyer the equivalent in their local currency using machine learning to determine the most relevant presentment currency.
How It Works With Manual Multi-Currency Prices
They coexist perfectly. Manual prices you’ve set (e.g., your EUR price) take priority over Adaptive Pricing for those specific currencies. In practice:
- A customer in Germany sees the fixed EUR price you defined.
- A customer in Japan sees the price automatically converted to JPY by Adaptive Pricing.
- A customer in the US sees your base USD price.
The conversion fee (2-4%) applied by Adaptive Pricing is passed to the customer — they see a slightly adjusted price in their local currency. You receive the amount in your base currency.
Requirements
Adaptive Pricing works with Checkout Sessions, Payment Links, and Hosted Invoice Pages. If you’re using Stripe Checkout from your application (the most common setup), you’re covered.
Watch out for this code issue: There’s a technical detail that can silently block Adaptive Pricing. If your Checkout Session creation code includes the parameter payment_method_types=['card'], this forces Stripe to show only card as a payment method and disables Adaptive Pricing along with local payment methods (iDEAL, SEPA Debit, Bancontact, etc.).
The fix is to remove that parameter entirely:
# ❌ Before (blocks Adaptive Pricing)
session = stripe.checkout.Session.create(
    line_items=[{"price": price_id, "quantity": 1}],
    mode="payment",
    payment_method_types=["card"],  # ← Remove this line
    success_url="https://yourdomain.com/success",
)

# ✅ After (Adaptive Pricing enabled)
session = stripe.checkout.Session.create(
    line_items=[{"price": price_id, "quantity": 1}],
    mode="payment",
    success_url="https://yourdomain.com/success",
)
Dashboard Activation
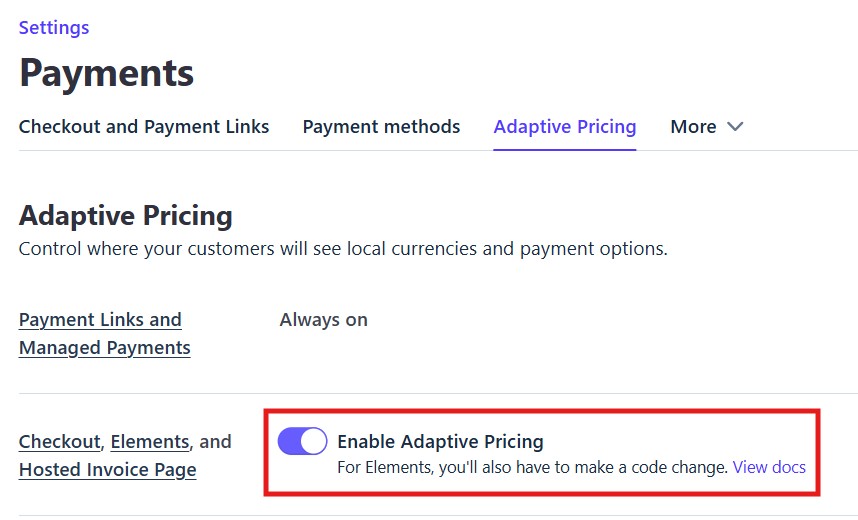
- Go to Settings → Payments → Adaptive Pricing.
- You’ll see two sections:
- Payment Links and Managed Payments: Always on (can’t be disabled).
- Checkout, Elements, and Hosted Invoice Page: Toggle on “Enable Adaptive Pricing”.
Verification
How do you know Adaptive Pricing is actually working? Check the details of a payment from an international customer. If they paid in their local currency (e.g., Peruvian soles for a customer in Peru), Adaptive Pricing is active. If they paid in USD, either their currency isn’t supported for automatic conversion, or something in your code is blocking it.
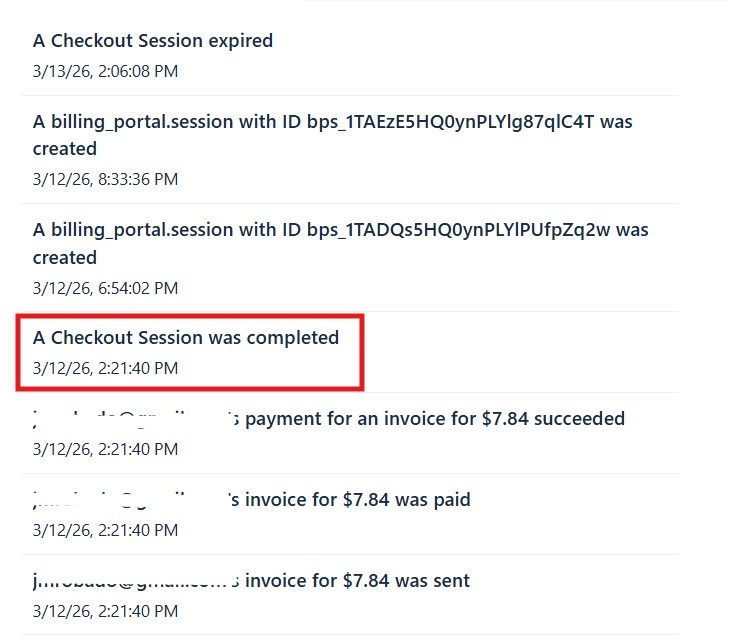
In the Dashboard, Checkout payments will show in the Events section: “A Checkout Session was completed”. And in the Logs tab you’ll see POST /v1/checkout/sessions.
Part 3: Configuring Stripe Tax
This is the most critical part, and the one most European indie founders get wrong — or skip entirely.
What Stripe Tax Does
Stripe Tax automatically calculates and applies the correct VAT on each transaction based on:
- Your business location (e.g., Spain, Germany, France).
- Your customer’s location (determined by billing address or IP).
- Whether your customer is a business (B2B) or individual (B2C).
- The type of product you sell (digital services, in our case).
The VAT Rules You Need to Know
Before configuring anything, it’s essential to understand the four tax scenarios that affect an EU-based seller of digital services:
Scenario 1 — Domestic customer (same country as you):
Standard VAT of your country applies (e.g., 21% in Spain, 19% in Germany, 20% in France). Declare in your regular quarterly VAT return.
Scenario 2 — Business customer in another EU country (B2B intra-community):
Invoice exempt from VAT (0%). The reverse charge mechanism applies: your customer self-assesses the VAT in their country. Requirements: the customer must have a valid VAT ID verifiable through VIES, and you must be registered for intra-community operations. Declared in the recapitulative statement (Model 349 in Spain, EC Sales List in other countries).
Scenario 3 — Individual customer in another EU country (B2C intra-community):
If your annual B2C sales to individual consumers across the EU don’t exceed €10,000, you can apply your domestic VAT rate. If you exceed that threshold, you must apply the VAT rate of the customer’s country and declare through the One-Stop Shop (OSS) system.
Scenario 4 — Customer outside the EU (anyone):
Transaction not subject to VAT. Doesn’t matter if the customer is a business or individual. Invoice without VAT.
Step-by-Step Configuration
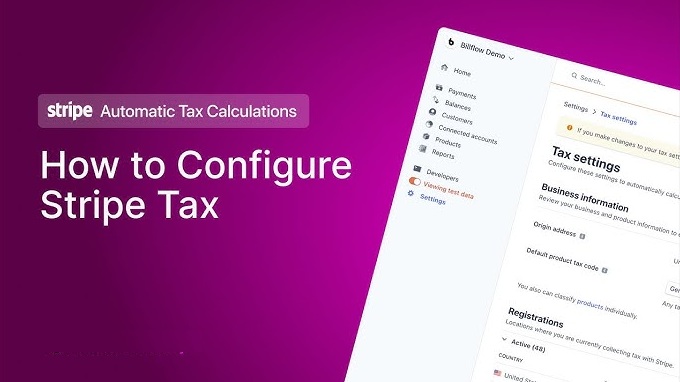
1. Navigate to Settings → Tax
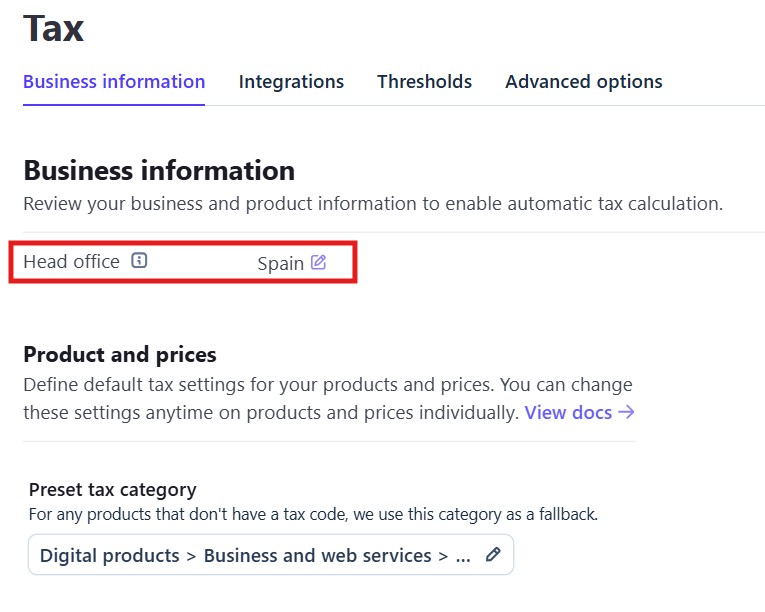
In the Stripe Dashboard, go to Settings → Tax. You’ll see tabs for Business information, Integrations, Thresholds, and Advanced options.
2. Business Information
- Head office: Must be set to your country (e.g., Spain). Edit if needed.
- Preset tax category: Select “Digital products > Business and web services”. This is the correct category for SaaS, online tools, and digital services.
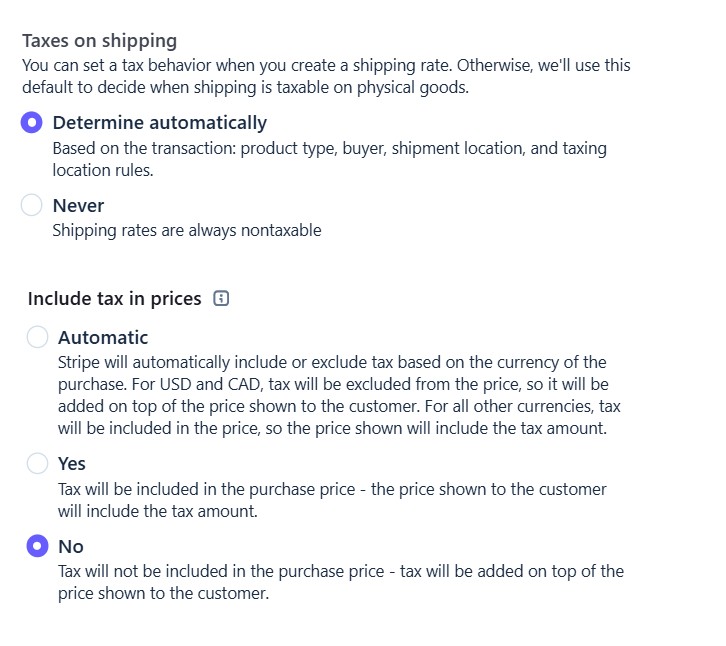
- Taxes on shipping: Select “Determine automatically” (safe default even if you don’t sell physical goods).
- Include tax in prices: Select “No”. This means tax will be added on top of the base price. A $29 product will cost a Spanish customer $29 + 21% = $35.09. This is the international standard for SaaS pricing.
3. Integrations
Check that Stripe Tax is connected to your payment flow. If you use Checkout Sessions, verify the integration is active. Typically, if Stripe Tax is enabled, Checkout uses it automatically.
4. Registrations
In the Registrations tab (within Tax settings), you tell Stripe where you’re registered to collect tax:
- Click “Add registration”.
- Select your country (e.g., Spain) and enter your tax ID (NIF/VAT number).
This tells Stripe you’re registered for VAT in your country and that it should charge the domestic VAT rate to local customers.
About OSS: When your B2C sales to individual EU consumers approach the €10,000 threshold, you’ll need to register for the One-Stop Shop with your tax authority and add that registration in Stripe Tax as well. But if you’re just starting out, this probably doesn’t apply yet.
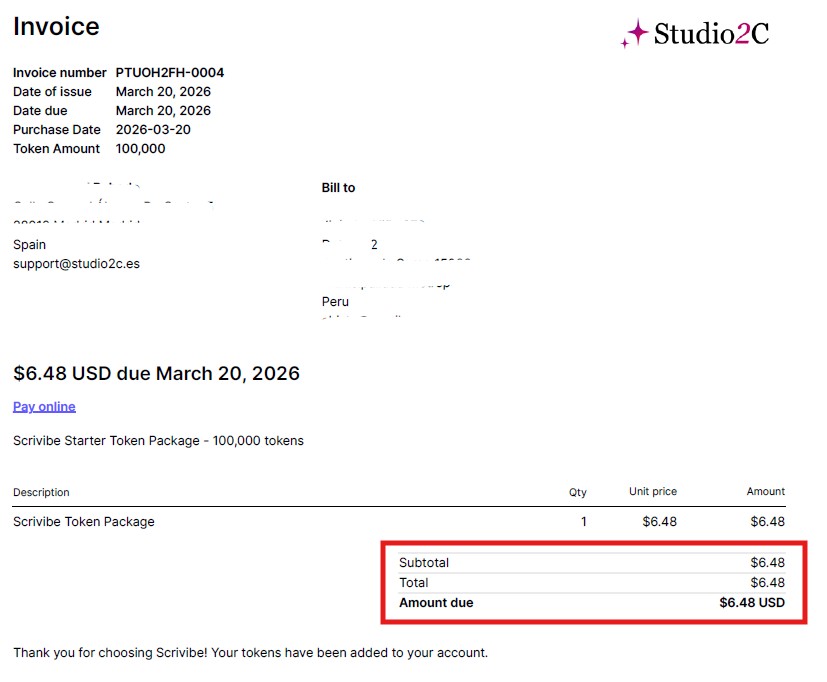
5. Verify With a Test Purchase
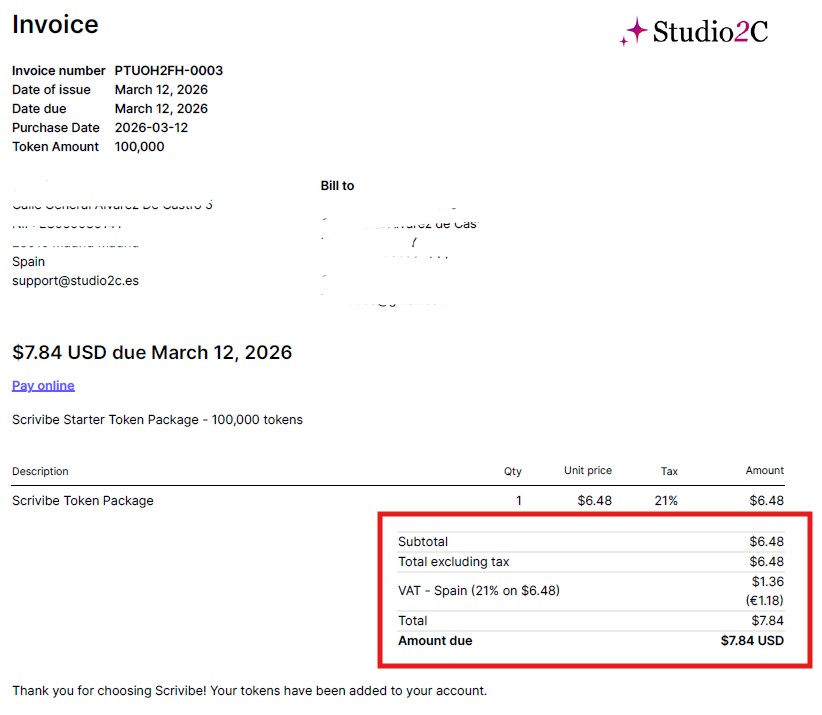
Make a real or test purchase (using Stripe’s test mode) from your own country. The invoice should show:
- Tax base (your price before VAT).
- A VAT line item: “VAT – [Your Country] (XX% on $XX.XX)”.
- Total including VAT.
Now simulate a purchase from a customer outside the EU. The invoice should show only the base price with no VAT.
Part 4: Invoice Template Customization
Stripe automatically generates invoices for each transaction, which is a major advantage. But the default template may not fully comply with your country’s invoicing requirements. You’ll likely need to customize two things.
Adding Your Tax ID to the Invoice
- Go to Settings → Invoices → Invoice template (or Branding → Invoice).
- In the sender details section, make sure your full legal name, fiscal address, and — critically — your tax identification number (NIF, VAT number, USt-IdNr., etc.) are displayed.
- If Stripe doesn’t have a dedicated field for the tax ID in the template, include it as part of the business name. For example: “Jane Smith (MyBrand) — NIF: ESXXXXXXXXX”.
Adding a Legal Footer
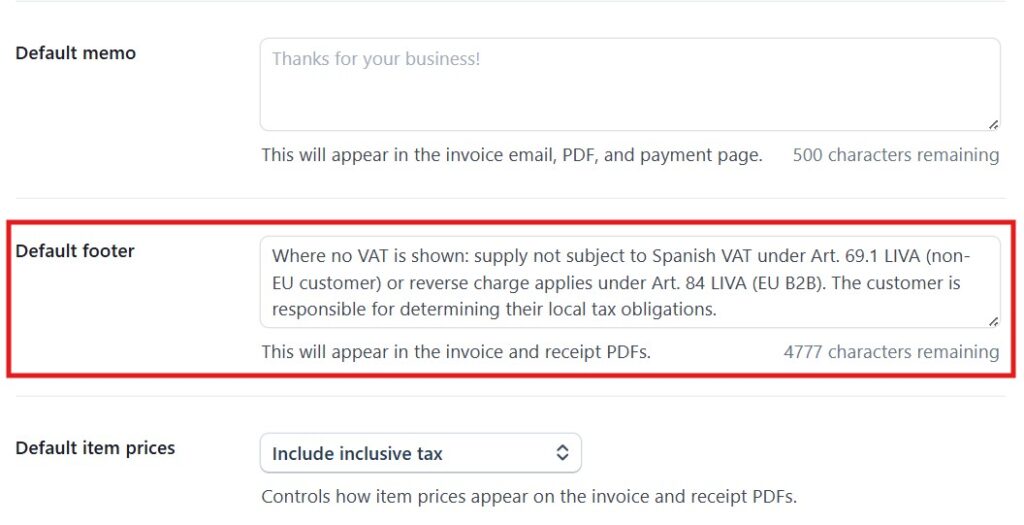
When an invoice doesn’t include VAT, most EU countries require you to state the legal reason. Since Stripe Tax generates invoices both with VAT (domestic customers) and without VAT (non-EU or B2B intra-community), you need a generic footer that covers all cases.
Go to the invoice template settings and add the following text in the Footer or Memo field:
Where no VAT is shown: supply not subject to VAT under [your country's relevant article] (non-EU customer) or reverse charge applies under [your country's reverse charge article] (EU B2B). The customer is responsible for determining their local tax obligations.For example, for a Spanish business:
Where no VAT is shown: supply not subject to Spanish VAT under Art. 69.1 LIVA (non-EU customer) or reverse charge applies under Art. 84 LIVA (EU B2B). The customer is responsible for determining their local tax obligations.This covers the two exemption scenarios and adds a liability disclaimer regarding the customer’s local tax treatment.
Part 5: Payout Configuration
Switch Your Settlement Currency to EUR
If you’ve been charging in USD and receiving payouts in dollars, it’s time to simplify. With Adaptive Pricing and multi-currency prices configured, the most efficient setup is to receive all payouts in euros:
- Go to Settings → Payouts (or Balance → Payout settings).
- If you have a bank account configured for USD payouts, remove it.
- Ensure only your local EUR bank account remains as the payout destination.
From this point on, everything you collect — whether in USD, EUR, Peruvian soles, or any other currency via Adaptive Pricing — will be converted to EUR before the payout is sent to you.
Payout Frequency: Switch to Daily
Stripe offers three frequencies: daily, weekly, and monthly.
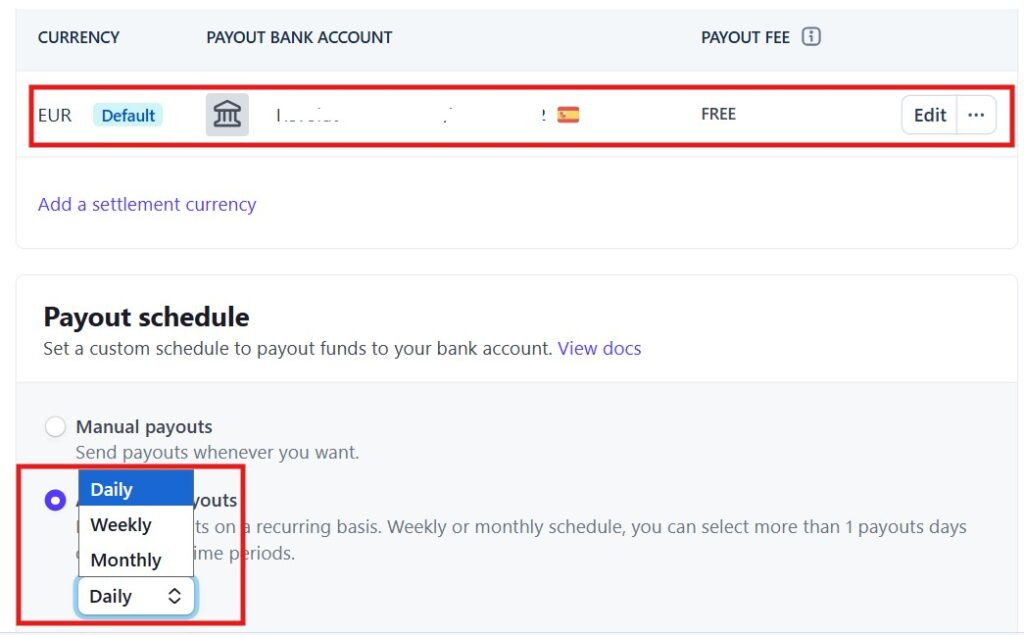
Recommendation: switch to Daily. Here’s why:
- You receive money faster (typically 2-3 business days in Europe).
- The correspondence between invoice and receipt is more direct, simplifying bookkeeping reconciliation.
- The exchange rate applied will be closer to the sale date, reducing foreign exchange differences in your accounts.
Note: Stripe doesn’t allow one payout per individual transaction. Even on daily mode, it bundles all of the day’s transactions into a single payout. But you can see the exact breakdown of which transactions are included in each payout in the Dashboard, and you can export CSVs for your accountant.
How to Handle Bookkeeping
Reconciliation works in two separate layers:
- Revenue (invoices): Each sale generates an invoice in Stripe. You record it as income at the moment of accrual (invoice date), not when the money arrives in your bank account.
- Collections (payouts): When the payout hits your bank, you reconcile it against the invoices it includes.
Stripe’s processing fees (shown in the monthly “Tax Invoice” that Stripe sends you) are a deductible expense. Record them separately.
Part 6: The Complete Checklist
After following all the steps in this guide, your Stripe configuration should include:
- Products with prices in USD (base) and EUR (manual) for the European market.
- Adaptive Pricing enabled in the Dashboard and unblocked in your code (no
payment_method_typesrestriction). - Stripe Tax enabled with:
- Head office: your country.
- Tax category: Digital products > Business and web services.
- Include tax in prices: No.
- Registration added for your country with your tax ID.
- Invoice template customized with your tax ID and legal footer.
- Payouts in EUR, daily frequency, to your local bank account.
When to Register for OSS
Monitor your B2C sales to individual EU consumers outside your own country. When they approach €10,000/year:
- Register for OSS with your national tax authority.
- Add the OSS registration in Stripe Tax (Registrations tab).
- From that point on, Stripe Tax will automatically apply the customer’s country VAT rate.
Stripe Tax Costs
Stripe Tax charges 0.5% per successful transaction (capped at $2). For low-volume SaaS businesses, this is manageable. If you scale significantly, alternatives like Quaderno or custom integrations may be more cost-effective for recurring subscriptions where the tax rate doesn’t change month to month.
Common Mistakes to Avoid
Not configuring Stripe Tax at all. Many indie founders assume that because they sell internationally, they don’t need to worry about VAT. Wrong. If you have customers in your own country, you must charge VAT. And if you have EU customers, the rules are very specific.
Leaving payment_method_types=['card'] in Checkout code. This silently disables Adaptive Pricing and local payment methods, costing you conversions without you knowing.
Not including your tax ID on invoices. It’s a legal requirement in virtually every EU country and a common audit trigger if missing.
Ignoring the €10,000 OSS threshold. Once you cross it, you’re legally required to charge each EU customer’s local VAT rate. Not knowing doesn’t exempt you.
Using a single currency for everything. You lose money on conversion spreads and your European customers see foreign-currency prices, reducing trust and conversion rates.
🇪🇸 Note for Spain-based founders: Spain has its own e-invoicing compliance regime called Verifactu, regulated by Royal Decree 1007/2023 under the Antifraud Law. After Royal Decree-law 15/2025 (December 2025), it becomes mandatory on January 1, 2027 for companies and July 1, 2027 for self-employed individuals (autónomos). Stripe itself is not a Verifactu-certified Invoice System (SIF), and doesn’t need to be — Stripe is a payment processor, and its invoices are commercial documents, not the legal Spanish invoice you’re required to issue. From those dates onward, you’ll need to issue your official Spanish invoices through certified billing software (Holded, Quaderno, Quipu, Anfix, Odoo, etc.), most of which already integrate with Stripe via API. If you’re based in Spain, plan this transition well before mid-2027. Other EU jurisdictions have parallel mandates rolling out (Italy’s SDI, France’s Factur-X / PPF, Germany’s e-invoicing rules) — check yours.
Conclusion
Setting up Stripe correctly for EU tax compliance isn’t difficult, but it requires understanding several pieces that are rarely explained together. The good news is that once configured, Stripe Tax handles most of the heavy lifting: it calculates the right VAT, generates compliant invoices, and gives you the reports you need for your tax returns.
For your specific situation, always consult with a tax advisor. This guide covers the general framework, but every case has its nuances.
Found this guide useful? Share it with other indie founders selling from Europe. For more content on the technical and fiscal side of running SaaS products, follow me on @studio2cx or subscribe to the Studio2C blog feed.